
You’ve been saying you’ll do it for ages…
…you know, finally turn your expertise into an online course so you can escape the whole “time for dollars” trap, and help even more people transform their lives.
But in spite of your best intentions, you just haven’t got around to it.
Well, my friend, we all know the road to hell is paved with good intentions… so let’s turn those good intentions into great actions and get your course online…
It’s easier than you think. In fact, you can do it in 7 simple steps…

Step 1: What are You Going to Teach?
There’s a good chance you’ve got a whole lot of ideas you’ve been considering, so let me help you make it easier…
Pick the one thing you can teach that will help your ideal client the most.
I’m talking about the solution to their biggest problem. The best transformation you can give them in the shortest time… we’re looking for impact and wow factor.
What problems do your clients tell you they have? If you don’t have clients *yet, list the problems your hypothetical “ideal client” has that you can help them solve.
If you’re still not sure, sit down with a pen and paper, and list out every idea that pops into your head.
Once you’ve got a list, grab your top three and run them by a few people in your target market. Ask them which one would be the most helpful. You’ll usually come out with a clear winner.
Resist the temptation to put everything you know into this first course.
Start with a simple promise (i.e. How to Build a WordPress Website in Less Than 2 Hours, or 5 Simple Steps to Improve Your Marriage this Week).
The promise needs to be something your audience really wants, but it shouldn’t be overwhelming (i.e. The Ultimate Guide to WordPress or A Comprehensive Guide to Saving Your Marriage).
Make sure it’s something you can deliver in short, actionable steps that actually allow your clients to achieve the promised result.
Do that, and you’ll get nothing but awesome reviews! (ok, you’ll always end up with one or two haters but we’re not catering to those people 😉 )
TIP: Online business groups and masterminds are great places to get feedback on your course ideas!
Step 2: How Are You Going To Teach It?
Now that you know what you’re going to teach, you need to figure out how you’re going to deliver that content. Is it going to be video? Will you provide handouts or worksheets? Transcripts? Recorded coaching calls or webinars?
How you decide to deliver your content will help you to determine what kind of technology you need to make it happen. I’ve included a tabbed guide below to help you figure out what you need, based on the type of content you want to create.
Talking Head Videos
Talking head videos are exactly that… your head talking directly to the camera. These are awesome to quickly build a relationship with your audience and are also fast to create. You can literally flip on the camera and start talking (no need for slides or special software).
What You’ll Need…
- a camera (your smartphone is perfect)
- a smartphone mount for your tripod – I use the ARKON Smartphone Grip Tripod Adapter
- a tripod – I use the Ravelli APLT4 61-inch Light Weight Aluminum Tripod
- a microphone – I use the Audio-Technica ATR-3350 Lavalier
- video hosting – my favorite is Wistia. You can even use their free version!
- a good place to shoot your video
- your face
Screen Capture Video
This type of video is great for giving Powerpoint-style presentations where you’re teaching conceptual information, or need to use visuals to illustrate your point. Or for presenting technical “how-to” type information (i.e. how to build a WordPress website, or how to set up an Etsy store).
What You’ll Need…
- Screen Capture Software
- Windows – Camtasia Studio
- Mac – Camtasia for Mac or Screenflow (I have them both… Camtasia is a little more advanced)
- Video Hosting – Wistia
Recorded Webinars
Webinars make great content for online courses and they also give you the opportunity to get interactive with your course participants who will love the opportunity to participate live while you create the content!
What You’ll Need…
- Webinar Software – there are dozens of options, but I use and recommend WebinarJam which runs on Google Hangouts..
When creating a course, the most important webinar feature is the ability to record in high definition. Watch out for free webinar software, which often lacks recording ability. Also, GoToWebinar records in a format that is notoriously difficult for Mac users to work with… consider yourself warned 😉
Recorded Calls
Recorded calls are another great way to get your clients and students involved in the product creation process. They’ll love the opportunity to participate and get their questions answered live!
What You’ll Need…
- Teleconference line – FreeConferenceCalling.com is totally free
- Audio hosting – SoundCloud is a great option
Handouts & Worksheets
Handouts and worksheets are a great way to add value to your online courses. These printer-friendly downloads can give depth and clarity to your programs, and give you clients a tangible way to interact with your material.
What You’ll Need…
- a word processing program that outputs to PDF
TIP: You can use Google Docs to create great looking PDFs for your online courses. Totally free with your Gmail account!
Step 3: Create an Outline
Taking the time to outline your online course is incredibly important. It will help keep you on point, as these courses can get out of control if you’re not careful.
Remember, less is more. People don’t buy online courses so they can spend years in the learning process… they want easy-to-consume, well-ordered, step-by-step content.
Spend some time outlining your process… write down the exact steps your clients need to take in order to reach their desired outcome. These steps will become your modules.
If this is your first course, I’d recommend sticking with modules that are no more than 30 minutes long. This makes your content creation easier and is short enough to keep your clients engaged.
Sample Online Course Outline
- Module 1: Purchase a domain name
- Module 2: Get a hosting account
- Module 3: Set Up WordPress
- Module 4: Customize Your Blog
- Module 5: Write Your First Blog Post
- Bonus Module: How to Get Social Media Traffic
IMPORTANT: A good rule of thumb is to break your course down into 5 to 7 modules. Any more than 7 steps will be overwhelming for your clients.
Step 4: Develop Your Content
This is where the rubber meets the road and you actually start creating your content. Write your scripts, create your presentations, record your videos, create your handouts… you get the idea.
This part is actually fairly easy when you’re teaching content you know well. Just set aside some time, get focused and get it done!
While you’re in creation mode it’s REALLY important to take the time to properly name your files. This will ensure you know where everything goes when it’s time to put it all together.
Start by creating a folder for this course on your desktop. In the image below, this course was just called “Training Material” (not very imaginative, I know 😉 )
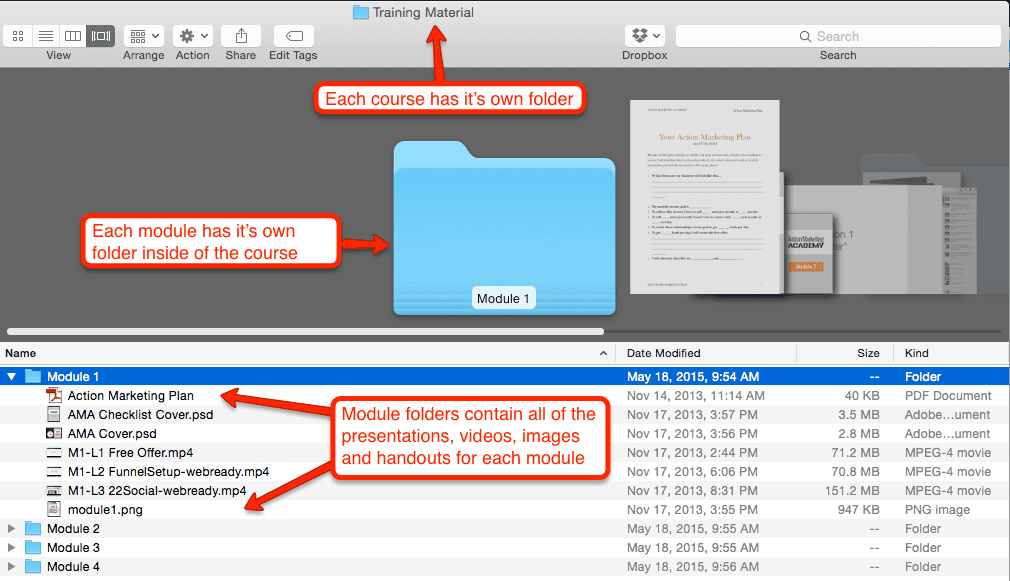
Once you have your main folder, create a subfolder for each of your modules. You will place all of your training material for each module in these module folders.
You’ll want to name your files according to what they are, as well as the order they should appear. In this example, I’ve named my videos M1-L1, M1-L2, M1-L3… this stands for:
- Module 1 – Lesson 1
- Module 1 – Lesson 2
- Module 1 – Lesson 3
That’s because in this course, I had more than 1 video per module and I wanted them to appear in a particular order.
I know you think you’ll remember where they all go when the time comes, but just trust me on this and organize your content as you create it. It will make your life so much easier when it comes time to publish.
TIP: Focus At Will is a great tool to help you shut out distractions and stay focused while developing content.
Step 5: Choose Your Platform
Your platform is where your clients will access all of your course content.
I run my courses on WordPress site, protected with a membership plugin and recently started using a Learning Management System as well. Here’s a screenshot of what that looks like in one of my courses:
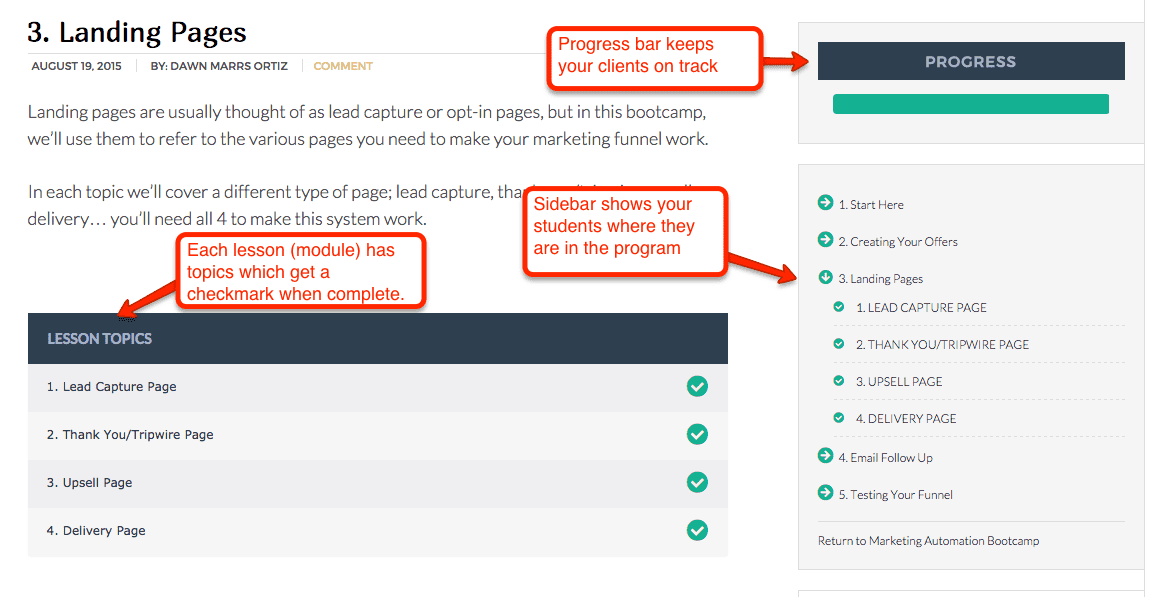
This is my favorite setup, but there are several options to choose from I’ve given you a few popular options below to help you decide what’s best for you.
WordPress Membership
This is what I used for all of my courses until this year (now I’ve added a Learning Management System (LMS), which I talk about in the next section).
This option is perfect if you have an existing WordPress web site and want a simple way to give your clients access to videos and downloads. Each of these options keeps you in control of your course and allows you to create Free, Trial, or Paid membership levels — or any combination of the three.
Pros:
- You get to keep 100% of your profit (minus transaction fees).
- It’s on your website so you own and control your content.
- You get to set the price of your course.
Cons:
- Slightly more technical (but if you have WordPress already you’re fine).
- Not part of a content network so you’ll need to get your own clients.
What You’ll Need…
- a self-hosted WordPress website
- a WordPress Membership plugin (here are my top 3 picks):
- Wishlist Member – solid choice and super inexpensive. This is what I used for years until I switched to Ontraport… highly recommend!
- Membermouse – very popular right now, but has an ongoing monthly fee ($99 for the mid-level option). My friend Lauren Gaggioli, founder of Higher Scores Test Prep swears by it.
- PilotPress – allows you to control your membership from your Ontraport dashboard (awesome). If you have Ontraport, this is the one you’ll choose as its part of your subscription.
- a way to process payment. I recommend Stripe.
WordPress Learning Management System
Learning Management Systems are quickly gaining popularity. They’re cool because they give you additional functionality your clients will love, including fancy progress bars, the ability to administer tests and to award badges and certificates.
Pros:
- added functionality
- clients love it
Cons:
- a little more money upfront ($97 for the one I use)
What You’ll Need…
- a self-hosted WordPress site
- a WordPress LMS plugin (I use LearnDash)
Online Learning Marketplaces
There are several online learning marketplaces where you can publish and sell your courses. The two big ones are Udemy and Skillshare.
To be completely transparent, I don’t recommend this option… It’s just too big not to include in this post. But if you were my client, I wouldn’t recommend it.
Pros:
- your course will be hosted on a large online learning network where it has the potential to be found by existing users
- these sites typically run ads meaning they will sell the course for you (and take up to 75% of your profit)
- super simple platforms that make it easy for a beginner to publish a course.
Cons:
- Need to go through an approval process to publish your course.
- Some of them have terms and conditions that give them exclusive rights to your content (meaning you can’t sell your course anywhere else).
- Loss of control of your content and pricing structure.
- Revenue sharing. In the case of Udemy, they take up to 75% of your profit. 50% for existing Udemy members, even if you directly sold them the course. With Skillshare you get a percentage of revenue based on the number of people you bring to the platform. I don’t know about you, but I’d rather keep 100% of my profit when I create a course.
Full disclosure: I don’t use these sites, but my friend Dana Malstaff, founder of Boss Mom hosts a couple of courses on both Udemy and Skillshare and has been really happy with the result. Check them out!
Keep in mind this is NOT a comprehensive list. There are lots of other systems out there… these are just a few simple ones to help you get started. Don’t get stuck in the details… pick a horse and ride it as they say.
Now that you’ve decided on a platform, it’s time to set it up and get your content online. You’re almost ready to launch!
Step 6: Publish Your Content
Now it’s time to take all that awesome, life-transforming training you’ve created and publish it. This means embedding your videos and audios into your platform, uploading your documents and making sure you properly protect your pages.
This is where you’ll be SO glad you organized and named your course content based on your modules. Now you can just drop the Module 1 content on the Module 1 page and save. Easy-peasy.
You’ll want to make some decisions here…
- Are you going to give your clients access to the entire course all at once? Or will you drip feed their course content on a weekly basis?
- Do they need to complete a quiz before getting access to the next module, or can they bounce around to whatever part of the course they’re most interested in?
All of those options can be set up inside your platform and will guide the user experience.
I personally like opening up a new module each Monday morning for 6 weeks (or the number of modules in the course). This ensures a guided experience to help them get the best result possible. It also gives me a new opportunity to engage with my clients at the beginning of each week and make sure they’re staying on track.
Whatever you decide, be sure to hold back some of your content until after the refund period is over. If they go through everything immediately they may feel there’s no reason to keep the course and ask for a refund.
TIP: Want to get your course online FAST? All you need to do is publish your welcome video and first module prior to launch. Then you can drip feed the existing content as you create it!
Step 7: Open the Doors
Now that you’ve got everything set up, it’s time to put it out there.
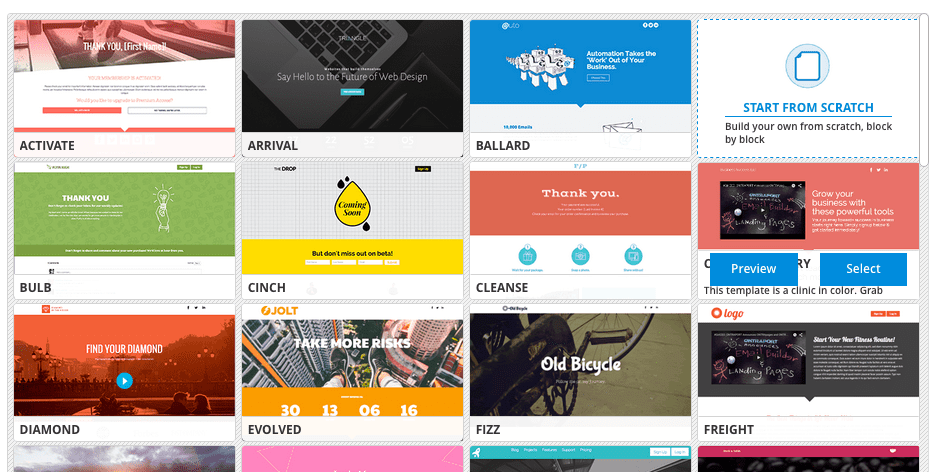
Create a sales page with details about your course, what students will learn by taking your training and the ability to purchase and get access to your course.

You’ll want to use a landing page creator for this step… I recommend LeadPages, unless you’re an Ontraport user. In that case, use Ontrapages… they’re beautiful, totally customizable, and are included with your subscription. Check ’em out…
Once you’ve got the sales page ready, there are lots of ways to get new clients. Here are a few ideas:
- Send the sales page to your existing clients
- Send the sales page to your email subscribers
- Write a blog post announcing the course
- Host a webinar to launch the course
- Use Facebook ads to advertise to your ideal client
The main thing is just to get lots of your ideal client seeing the sales page so they can decide to take your course.
So that’s it… the 7 simple steps you can use to create your online course.
Now, it’s time to get to work and finally get your expertise online, escape the time for dollars trap and make a bigger impact in the world.
xo Dawn
Dawn, Thanks for the shout out. As always, you gave amazing content. I already make courses and this was fun to read. So nicely put together and awesome tips.
Hey Dana! My favorite Boss Mom 🙂 Thank you so much… you definitely inspired me to look closer at sites like Udemy and Skillshare, and I’m happy to give you a shout out!
Hi Dawn-
What a fantastic article this is for people looking to get started with creating (and selling) online courses!
Thank you as well for your recommendation on using LearnDash. We really love seeing people like you successfully selling courses. We are honored and humbled to play a small part in that story 🙂
Kindly,
Justin